The Engineer Tutor
Learn from our Experience


Taking PCB Pictures
I like to take pictures of the PCB’s that we produce. It is nice to give you a view of what we are working on. Like they say a picture is worth a thousand words and it seems that I type enough words. The problem is getting a good picture. Something that shows the details and allows you to read the part number of the processor we are using. That has been my goal. The contrast of the printing on some of the chips isn’t good.
I have read articles on how to do it properly and taken many pictures. I don’t have an expensive camera. I have been using a Panasonic DMC-LX2 point and shoot. I put it in the macro mode so that it can focus at the distance I’m using it at which is about 7-8 inches from the PCB. The articles talk about a light box to produce a soft light on the subject without hot spots. I looked at some of the do-it-yourself articles on light boxes. I looked at commercial boxes, willing to spend a bit but, nothing gave me access to the subject directly overhead.
I decided I needed to make one myself but, not like any I have seen. Some of my requirements were to have access to an overhead view of the subject so, the top had to be open. I needed access to the camera from the side also as the base I use to hold the camera requires that. I wanted to illuminate the subject from three sides to help eliminate the shadow that is created by one light source. So, with these requirements I came up with the following design.
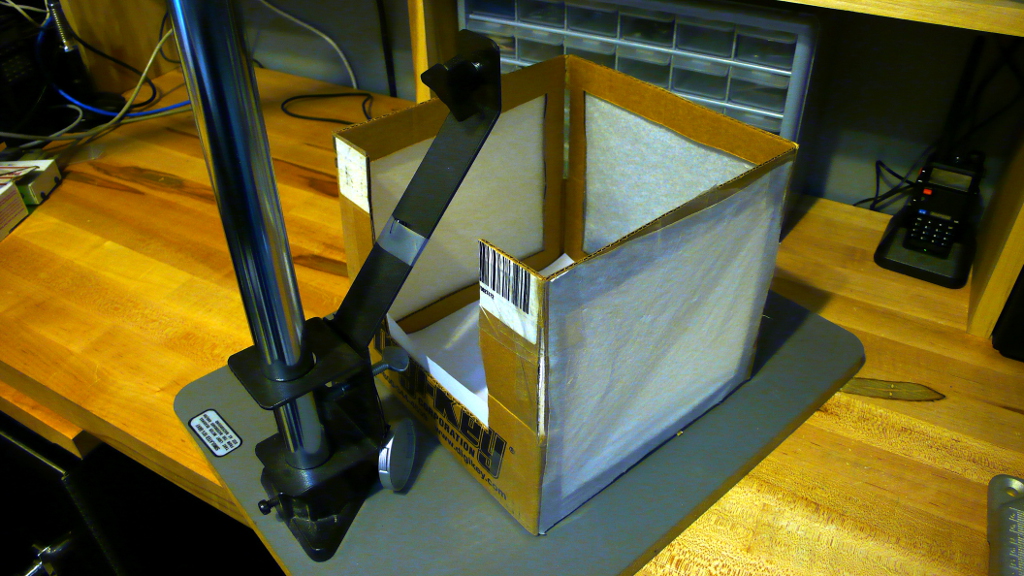
Yes, it is a Digi-Key box. We receive so many parts from them that we have a lot of their boxes laying around. Not that I’m trying to plug Digi-Key they do provide a great service. If you need something the next day they are very reliable if you can order before the deadline. You can see that I have three light sources and that my camera stand requires the slit I made in the box. The rest of the sides have been cut out and covered with tissue paper. This gives some very uniform lighting which has improved my PCB picture taking a lot.
I put the camera into manual mode and set the aperture to F8 then adjusted the shutter speed to get a good exposure. The white balance is set to indoor lighting. I also set the ISO setting on the camera to 100 to reduce the noise as much as possible. Then using the optical zoom I zoom into the board and bring as many pixels as possible into play. I do use the auto focus on the camera I set it to macro mode and do the half shutter button press to allow it to do its thing. Then I setup the timer and let the timer take the picture.
Just a couple of items on the settings of the camera. The camera I’m using has a maximum aperture setting of F8 and that is what I use. This gives me a greater depth of field. That is to say the focal point of the camera is larger and makes it easier to keep things in focus. The shutter speed gets down to 1/15 of a second so a tripod is a must. The best a human can hold a camera for is 1/60 of second and even then you have to be careful about holding the camera steady. Finally the ISO setting, my camera has the capacity of going to ISO 1600. That would make the camera very sensitive to light. The problem is there is a lot of noise introduced into the picture. If you remember the old analog cameras the higher the ISO number the grainier the picture. There is a similar thing going on in the digital cameras. ISO 100 is the lowest number my camera has and that seems to work well. So, using ISO 100 with the F8 aperture gives me a shutter speed of 1/15 of a second to get a good exposure with my light box setup.
With this setup I’m able to get some reasonable pictures. The light box makes a lot of difference in eliminating shadows and other problems with the lighting.
The resulting pictures can be found on the site. Take a look at them and I hope you found this interesting. I did a lot of research and experimentation before I settled on this. I was struggling because of the digital camera. I use to take lots of pictures with an old Honeywell Pentax analog SLR. I thought I had a pretty good handle on how to take pictures. Translating that to the digital camera was a challenge for me until I realized that the digital camera used the same nomenclature as the analog camera. Once I realized that it was a breeze to get good pictures. Hope you found this instructive.