The Engineer Tutor
Learn from our Experience


Working with Bread Boards and Surface Mount Devices (SMD)
These devices have received the reputation of being difficult to work with and aren’t suitable for bread boarding. I have been working with these devices for 15 years and have found ways to work with them in a bread boarding situation.
There are several options for using these devices on bread boards. You can go to Sparkfun and by break out boards (https://www.sparkfun.com/products/9966). These boards place the devices on small boards with pins that plug into a bread board. This is a great option and very convenient. But, suppose you already have the device and don’t want to wait for a break board to be shipped. There are other alternatives.
I start with some perf board and mount the device on the perf board. I then put some pins on the board wire to the pins and I’m able to use my SMD in a bread board situation. I’m going to talk about using a mini B USB connector in a bread board. I had a project where I wanted to interface a PIC24FJ64GB002 to a PC using USB. I needed a connector to do this. I had some mini B USB connectors laying around from another project. I decided to use one of these. But, the connector was an SMD, it wouldn’t just plug into the bread board. So, I did the following.
To attach this connector to a perf board I started by soldering wires to the tiny connectors of the mini B USB connector. I found it easier to do this while the device wasn’t attached to the board. It is too difficult to solder the wires on after the device is attached to a perf board, believe me I tried. This is actually my second attempt at making this board. In the following picture you can see the wires soldered onto the connector. There are five of them. Note, there are some tricks in using a soldering iron to do this. Make sure your tip is clean, well tinned, and remove all excess solder as you don’t want to bridge the pins. Also tin the pins with a bit of solder and tin the wires also. Then hold the wire next to the pin and just touch it with the iron. It is that simple.
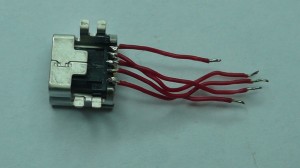
It is handy to have at least a 5x lighted magnifier. My eyes are getting older and are fading a bit. I use my magnifier for almost everything I do with the small electronic devices these days.
With the wires soldered on I can now put the connector on the perf board. I bought my perf board from Radio Shack. I have one just a 1/2 mile from my house. It is very close and easy to run over and grab things. Before I put the device on the perf board I had to modify the perf board a bit. I took a hobby knife and scraped off a couple of pads so that the pads wouldn’t short out the small connectors on the mini B connector.
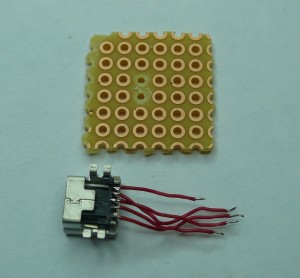
In the picture you can see the perf board and how I have clipped out just enough to hold the connector along with the pins necessary to plug it into the perf board. I can also see the two pads I scraped off to prevent the connectors from shorting out.
I then soldered the connector to the perf board. Now I’m ready to connect the wires to the pins I’m going to plug into the bread board.
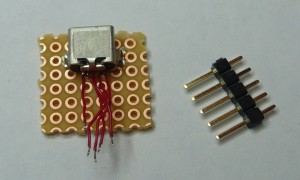
To do this I pushed the pins into a bread board and used some other pins turned side ways to hold the pins and board in the proper position. This makes it really easy to solder the wires to the pins in a point to point fashion. I haven’t had any problems with melting the bread board doing this.
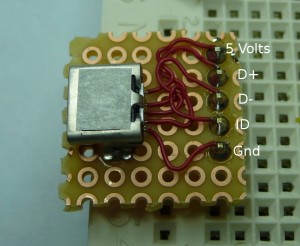
Here you can see the finished product. It is in a bread board and already wired up. This is the PIC24FJ64GB002 circuit I talked about before. That is another story.